Please follow all the steps to ensure your camera doesn’t separate from your bike during use.
Step 1: Installing the safety tether
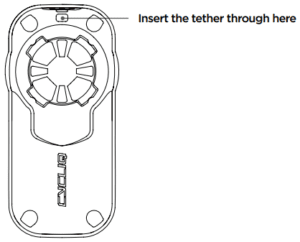
- On the back of the Fly6 there are two holes for the safety tether to be attached through.
- Thread the thinner part of the tether through the holes, then thread the other end through the loop to secure the tether.
- We recommend always using the Fly6 with the tether attached and secured around your seat post.
Step 2: Mounting the camera to your bike
Please see the image below on how to mount the device, you will need to turn your Fly6 Generation 3 clockwise.
Note: We suggest mounting the seat post mount to your bicycle and then attempting to mount the device, that way there is more stability in order to twist the device.
Insert either the standard or aero length seat post strap and pull all the way through until the clasp meets the seat post mount, ensuring the silicon-coated surface grips your seat post.
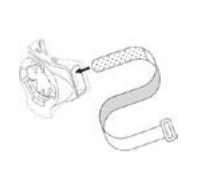
Select the appropriate spacer or adapter for your bike. Place the spacer or adapter between the Fly6 seat post mount and the seat post.
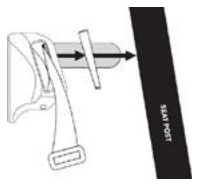
While holding the mount against your seat post, wrap the velcro strap around and feed it through the rectangular hoop at the other end of the strap. Wrap the velcro back on itself to secure your mount.
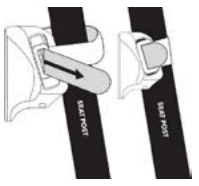
To mount your Fly6 align the tabs on the Fly6 with the slots in the seat post mount. Turn Fly6 clockwise a 1/8th turn until you hear a click and then the Fly6 will be locked into the seat post mount.
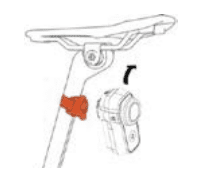
You can easily remove your Fly6 from the bike by removing it from the seat post mount with a 1/8th turn anticlockwise. You can leave the mount on your bike for next use.
Note: The Fly6 must be mounted in an upright position as mounted.
Ready for your first ride? Check out Start Up and First Ride.


 Fly6 Pro
 Fly12 Sport
 Fly6 GEN 3
 Compare
 Ultimate Bundle
 Essential Bundle
 Fly6 Pro
 Fly12 Sport
 Fly6 GEN 3
 Mounts
 Cases
Cases Jackets
 View All Accessories
 Videos