Step 1: Inside the Box
Firstly, let’s check to see if you have all the goods.
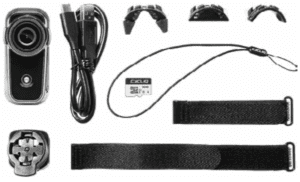
Your Fly6 Generation 3 should come with the following:

Text version:
- 1 x Fly6 Generation 3
- 1 x Cycliq 64GB microSD card
- 1 x Seat post mount
- 1 x Standard seat post strap
- 1 x Aero seat post strap
- 1 x 0° (zero degree) spacer
- 1 x D-spaced seat spot adaptor
- 1 x Aero seat post adaptor
- 1 x USB to USB-C cable
- 1 x Safety tether
- 1 x Safety information and warranty sheet (not pictured)
- 1 x Quick Start Guide (not pictured)
Step 2: Insert your SD card
Your Fly6 3 comes with a 64GB microSD card pre-installed.
Your Fly6 3 MUST have a microSD card installed to operate.
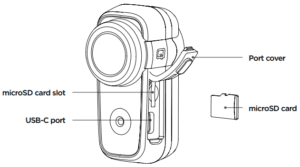
You can insert a microSD card into the microSD card slot of your Fly6 and press in gently until locked in place.
Please ensure the notch on the microSD card is pointing upwards towards the top of the Fly6, as illustrated here.
To remove your microSD card, gently press down on the microSD card until it releases from the microSD card slot.
Note: We highly recommend formatting your microSD card regularly. This will ensure your Fly6 operates at peak performance and guarantee your ride is always recorded. More information of how to format your microSD card is available here.

Step 3: Charge your unit
Charging your Fly6 battery
Your Fly6 comes partially charged. Before using it for the first time, please charge the Fly6 fully.
To charge:
- Connect your Fly6 to a USB power adaptor (not supplied) using the supplied USB cable.
- The indicator light will illuminate red showing the Fly6 is charging.
- The indicator light will illuminate green when the Fly6 is fully charged.
You can charge your Fly6 using the USB cable provided and your computer however, this will significantly reduce the rate of charge. For the quickest charge, use a USB power adaptor that supports USB fast charge (5V @ 2.1A).
Note: The Fly6 is ‘fast charge’ compatible and accepts up to 2.1 amps. Accordingly, the time to charge from flat to fully charged varies from 1.5 to 6 hours depending on the method of charging, I.e. mains power USB at 2.1 amps (not supplied) or computer USB (at as little as 0.1A). Battery life will diminish over time and charge cycles.
Battery level indicator
When turning on your Fly6, an audible battery status will sound, alerting you to the current battery level. This will indicate whether you have enough power for your next ride. See below for audible notification guide:
![]()
4 rapid high pitched beeps = 75% to 100% charged
![]()
3 rapid high pitched beeps = 50% to <75% charged
![]()
2 rapid high pitched beeps = 25% to <50% charged
![]()
1 rapid high pitched beep = 12% to <25% charged
![]()
3 long high pitched beeps = Less than 12% charged
Step 4: Download the CycliqPlus Mobile App
Download the CycliqPlus app onto your mobile and pair your device to regularly sync date and time.
- Launch the CycliqPlus app
- Power your device on to activate Bluetooth
- Search and Connect to your device (Note: connecting the device to the app automatically updated the date and time)
Step 5: Format your SD Card
Format your SD card.
The simplest way to do this is by using the CycliqPlus mobile app:
- Go to Settings
- Under Settings, select System configuration
- Click Format SD card.
Note: A popup notification will appear. To proceed, select “Format.” You will then be notified once formatting is successful.
Other ways to format your SD card include through the CycliqPlus desktop app or removing the SD card and connecting it to your computer using a SD card adaptor. For more information check out cycliq.com/sdcards.
Step 6: Register your device
Register your device for faster support and warranty enquiries.
We strongly advise that you register your Fly6 Generation 3 with Cycliq. Once registered, you’ll receive notifications for new software or firmware updates, new features and user tips. Registration also speeds up the process should you require assistance with technical support or warranty queries.
To register your Fly6 Generation 3, visit cycliq.com/register, or use the CycliqPlus mobile app.


 Fly6 Pro
 Fly12 Sport
 Fly6 GEN 3
 Ultimate Bundle
 Fly6 Pro
 Fly12 Sport
 Fly6 GEN 3
 Mounts
 Cases
Cases Jackets
 View All Accessories
